闪烁问题
1.ASNetworkImageNode reload闪烁
原因: ASCellNode中包含有ASNetworkImageNode时,当这个cell reload,ASNetworkImageNode会异步从本地缓存或者网络请求图片,请求到图片后再设置ASNetworkImageNode展示图片,但在异步过程中ASNetworkImageNode会先展示PlaceholderImage,从PlaceholderImage—>fetched image的展示替换导致闪烁发生,即使cell的数据没有任何变化,只是简单的reload,ASNetworkImageNode的图片加载逻辑依然不变,仍然会闪烁。
而对于UIImageView,YYWebImage或者SDWebImage对UIImageView的image设置逻辑是,先同步检查有无内存缓存,有的话直接显示,没有的话再先显示PlaceholderImage,等待加载完成后再显示加载的图片,逻辑是memory cached image—>PlaceholderImage—>fetched image的逻辑,刷新当前cell时,如果数据没有变化memory cached image一般都会有,因此不会闪烁。
Texture官方给的修复方案:
1
2
3
let node = ASNetworkImageNode()
node.placeholderColor = UIColor.white
node.placeholderFadeDuration = 3
上面修改方案确实没有看到闪烁,但是方案是将PlaceholderImage-->fetched image图片替换导致的闪烁拉长到3秒,并没有从根本上解决问题。
按照上述reload闪烁的原因,先检查有无缓存,有缓存的话直接设置Image,继承一个ASNetworkImageNode的子类,复写url设置逻辑:
1
2
3
4
5
6
7
8
9
10
11
12
13
14
15
16
17
18
19
20
21
22
23
24
25
26
27
28
29
30
31
32
33
34
35
36
37
38
39
40
41
42
43
44
45
46
47
48
49
50
51
class NetworkImageNode: ASDisplayNode {
  private var networkImageNode = ASNetworkImageNode.imageNode()
  private var imageNode = ASImageNode()

  var placeholderColor: UIColor? {
    didSet {
      networkImageNode.placeholderColor = placeholderColor
    }
  }

  var image: UIImage? {
    didSet {
      networkImageNode.image = image
    }
  }

  override var placeholderFadeDuration: TimeInterval {
    didSet {
      networkImageNode.placeholderFadeDuration = placeholderFadeDuration
    }
  }

  var url: URL? {
    didSet {
      // 这里用到SDWebImage缓存机制
      guard let u = url,
        let image = UIImage.cachedImage(with: u) else {
          networkImageNode.url = url
          return
      }

      imageNode.image = image
    }
  }

  override init() {
    super.init()
    addSubnode(networkImageNode)
    addSubnode(imageNode)
  }

  override func layoutSpecThatFits(_ constrainedSize: ASSizeRange) -> ASLayoutSpec {
    return ASInsetLayoutSpec(insets: .zero,
                             child: networkImageNode.url == nil ? imageNode : networkImageNode)
  }

  func addTarget(_ target: Any?, action: Selector, forControlEvents controlEvents: ASControlNodeEvent) {
    networkImageNode.addTarget(target, action: action, forControlEvents: controlEvents)
    imageNode.addTarget(target, action: action, forControlEvents: controlEvents)
  }
}
2.reload 单个cell时的闪烁
当ASTableNode/ASCollectionNodereload某个indexPath的cell时也会闪烁,原因都是跟ASNetworkImageNode差不多,都是异步的问题。当异步计算cell的布局时,cell使用placeholder占位(通常是白图),布局完成时,才用渲染好的内容填充cell,placeholder到渲染好的内容切换引起闪烁。
官方修复方案:
1
2
3
4
5
6
func tableNode(_ tableNode: ASTableNode, nodeForRowAt indexPath: IndexPath) -> ASCellNode {
  let node = ASCellNode()
  ...
  node.neverShowPlaceholders = true
  return node
}
设置node.neverShowPlaceholders = true,会让cell从异步状态衰退回同步状态,若reload某个indexPath的cell,在渲染完成之前,主线程是卡死的,这与UITableView的机制一样,但速度会比UITableView快很多,因为UITableView的布局计算、资源解压、视图合成等都是在主线程进行,而ASTableNode则是多个线程并发进行,而且布局等还有缓存。
3.减缓卡顿
设置ASTableNode的leadingScreensForBatching = 3可以减缓列表滚动时卡顿问题,即提前计算3个屏幕的内容:
1
tableNode.leadingScreensForBatching = 3
4.reloadData时闪烁
当下拉列表刷新数据时,调用ASTableNode/ASCollectionNode的reloadData方法,列表会出现很明显的闪烁现象。修复方案是每次刷新算出需要添加的,删除/刷新的 indexPath 或者 section,再对这部分调用对应的局部刷新。
1
2
3
4
5
6
7
8
9
10
11
12
13
14
15
16
17
18
19
// ASTableNode
// Rows
- (void)insertRowsAtIndexPaths:(NSArray *)indexPaths withRowAnimation:(UITableViewRowAnimation)animation
- (void)deleteRowsAtIndexPaths:(NSArray *)indexPaths withRowAnimation:(UITableViewRowAnimation)animation
- (void)reloadRowsAtIndexPaths:(NSArray *)indexPaths withRowAnimation:(UITableViewRowAnimation)animation
// Sections
- (void)insertSections:(NSIndexSet *)sections withRowAnimation:(UITableViewRowAnimation)animation
- (void)deleteSections:(NSIndexSet *)sections withRowAnimation:(UITableViewRowAnimation)animation
- (void)reloadSections:(NSIndexSet *)sections withRowAnimation:(UITableViewRowAnimation)animation

// ASCollectionNode
// Rows
- (void)insertItemsAtIndexPaths:(NSArray<NSIndexPath *> *)indexPaths
- (void)deleteItemsAtIndexPaths:(NSArray<NSIndexPath *> *)indexPaths
- (void)reloadItemsAtIndexPaths:(NSArray<NSIndexPath *> *)indexPaths
// Sections
- (void)insertSections:(NSIndexSet *)sections
- (void)deleteSections:(NSIndexSet *)sections
- (void)reloadSections:(NSIndexSet *)sections
关于布局
1.flexGrow
- 定义子视图的放大比例,
flexGrow是指当有多余空间时,拉伸谁以及相应的拉伸比例。 - 该属性来设置,当父元素的宽度大于所有子元素的宽度的和时(即父元素会有剩余空间),子元素如何分配父元素的剩余空间。
flex-grow的默认值为0,意思是该元素不索取父元素的剩余空间,如果值大于0,表示索取。值越大,索取的越厉害。
1
2
3
4
5
6
7
8
9
10
11
12
13
14
15
16
17
18
19
20
21
22
23
24
25
26
27
28
29
30
31
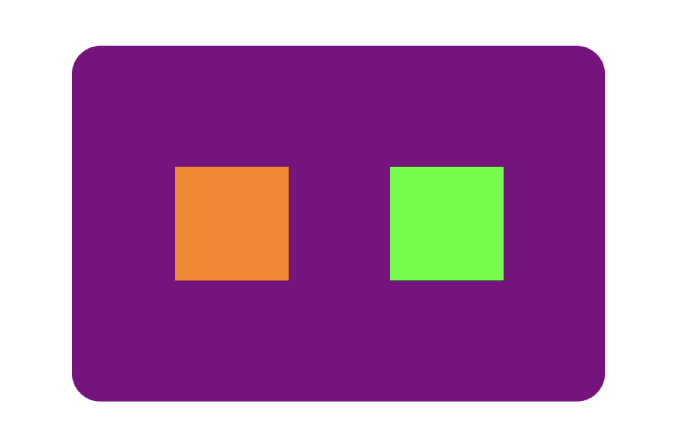
import UIKit
import AsyncDisplayKit
class ContainerNode: ASDisplayNode {
let nodeA = ASDisplayNode()
let nodeB = ASDisplayNode()
override init() {
super.init()
self.backgroundColor = .purple
self.cornerRadius = 16
nodeA.backgroundColor = .orange
nodeB.backgroundColor = .green
nodeA.style.preferredSize = CGSize(width: 64, height: 64)
nodeB.style.preferredSize = CGSize(width: 64, height: 64)
self.addSubnode(nodeA)
self.addSubnode(nodeB)
}
override func layoutSpecThatFits(_ constrainedSize: ASSizeRange) -> ASLayoutSpec {
let spec1 = ASLayoutSpec()
spec1.style.flexGrow = 1
let spec2 = ASLayoutSpec()
spec2.style.flexGrow = 1
let spec3 = ASLayoutSpec()
spec3.style.flexGrow = 1
return ASStackLayoutSpec(direction: .horizontal, spacing: 0, justifyContent: .start, alignItems: .center, children: [spec1, nodeA, spec2, nodeB, spec3])
}
}
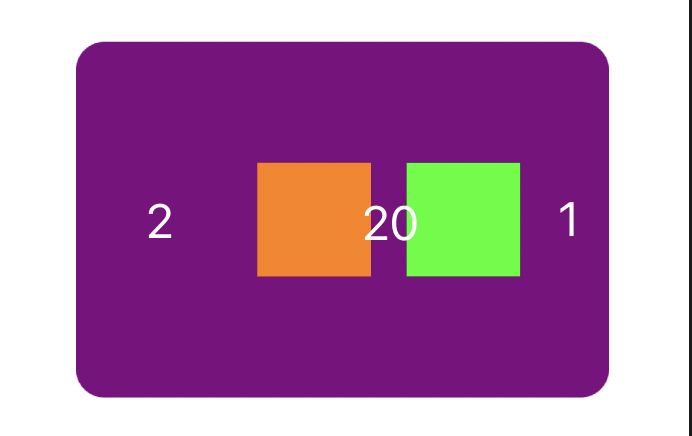
如果spec的flexGrow不同就可以实现指定比例的布局,再结合width样式可以实现以下布局。
1
2
3
4
5
6
7
8
9
override func layoutSpecThatFits(_ constrainedSize: ASSizeRange) -> ASLayoutSpec {
   let spec1 = ASLayoutSpec()
   spec1.style.flexGrow = 2 // 间距比例
   let spec2 = ASLayoutSpec()
   spec2.style.width = ASDimensionMake(20) // 间距宽20
   let spec3 = ASLayoutSpec()
   spec3.style.flexGrow = 1 // 比例
   return ASStackLayoutSpec(direction: .horizontal, spacing: 0, justifyContent: .start, alignItems: .center, children: [spec1, nodeA, spec2, nodeB, spec3])
}
2.flexShrink
- 缩小比例,当空间不足的时候,缩小子视图,如果所有的子视图都设置为1就是等比例缩小,如果有一个子视图设置为0,表示该视图不缩小。
- 该属性来设置,当父元素的宽度小于所有子元素的宽度的和时(即子元素会超出父元素),子元素如何缩小自己的宽度的。
flex-shrink的默认值为1,当父元素的宽度小于所有子元素的宽度的和时,子元素的宽度会减小。值越大,减小的越厉害。如果值为0,表示不减小。
举个例子: 父元素宽400px,有两子元素:A和B。A宽为200px,B宽为300px。则A,B总共超出父元素的宽度为(200+300)- 400 = 100px。
如果A,B都不减小宽度,即都设置flex-shrink为0,则会有100px的宽度超出父元素。如果A不减小宽度:设置flex-shrink为0,B减小。则最终B的大小为 自身宽度(300px)- 总共超出父元素的宽度(100px)= 200px如果A,B都减小宽度,A设置flex-shirk为3,B设置flex-shirk为2。则最终A的大小为 自身宽度(200px)- A减小的宽度(100px * (200px * 3/(200 * 3 + 300 * 2))) = 150px,最终B的大小为 自身宽度(300px)- B减小的宽度(100px * (300px * 2/(200 * 3 + 300 * 2))) = 250px
3.frame布局
如果ASDisplayNode采用frame布局方式,那么它的动画跟UIView一样。
1
2
3
4
5
6
7
8
func animateContainer() {
   let kwidth = UIScreen.main.bounds.width
   DispatchQueue.main.asyncAfter(deadline: .now() + 1) {
     UIView.animate(withDuration: 0.5) {
       self.containerNode.frame = CGRect(x: (kwidth - 300)/2, y: 160, width: 300, height: 200)
     }
   }
}
对于flexbox布局,需要复写Texture动画API func animateLayoutTransition(_ context: ASContextTransitioning),在动画上下文context获取animate前后布局信息,然后自定义动画。
3.子线程崩溃问题
由于Texture的性能优势来源于异步绘制,异步的意思是有时候node会在子线程创建,如果继承了一个ASDisplayNode,一不小心在初始化时调用了UIKit的相关方法,则会出现子线程崩溃。
1
2
3
4
5
6
7
8
9
class TestNode {
  let imageNode: ASDisplayNode
  override init() {
    imageNode = ASImageNode()
    // UIImage(named:)并不是线程安全,会崩溃
    imageNode.image = UIImage(named: "test.png")
    super.init()
  }
}
4.ASLayoutSpec
当 spaceBetween 没有达到两端对齐的效果,尝试设置当前 layoutSpec 的 width,或它的上一级布局对象的 alignItems,在例子中就是 stackLayout.alignItems = .stretch。
1
2
let spec2 = ASLayoutSpec()
spec2.style.width = ASDimensionMake(20) // 间距宽20
其他问题
1.关于tintColor
ASImageNode 不支持直接设置图片的 tintColor ,如果需要设置,则需要通过 imageModificationBlock 进行设置。
1
imageNode.imageModificationBlock = ASImageNodeTintColorModificationBlock(.orange)
如果是直接向改变ASButtonNode中的tintColor,是不可以修改的,而是要通过设置ASButtonNode不同的状态图片才可以改变的。
1
2
buttonNode.setImage(image, for: .normal)
buttonNode.setImage(image.tinted(with: .orange), for: .selected)
2.关于高度
ASDisplayNode高度计算问题,如果在UIView或者UITableViewCell/UICollectionViewCell中添加ASDisplayNode,而需要计算ASDisplayNode的高度,一种方法本事ASDisplayNode是用frame布局的可以直接获取高度;另一种的ASDisplayNode 实现了 - (ASLayoutSpec *)layoutSpecThatFits:(ASSizeRange)constrainedSize 情况下,可以调用 - (ASLayout *)layoutThatFits:(ASSizeRange)constrainedSize 方法计算出大小。
1
2
3
let layout = node.layoutThatFits(ASSizeRangeMake(CGSize.zero,
						  CGSize(width: view.frame.width,								  		 height: CGFloat.greatestFiniteMagnitude)))
print(node.calculatedSize.height)
3.ASDisplayNode问题
给ASDisplayNode 的 View 添加手势,则需要在didLoad方法中添加,这个方法类似于viewDidLoad方法,它被调用一次,并且是后台视图被加载的地方。它保证在主线路上被调用,并且是做任何UIKit事情的合适的地方(比如添加手势识别器,触摸视图/层,初始化UIKit对象)。
关于initWithViewBlock初始化ASDisplayNode时,需要注意retain cycle循环引用问题,持有self的变量初始化时需要设置weak弱化。
4.关于UITableViewCell不能点击
ASCellNode里面再嵌套UITableViewCell时,在不同版本的手机会出现无法响应点击事件,解决方法:
1
2
3
4
5
6
let cellNode = ASCellNode { () -> UIView in
	let cell = UITableViewCell(style: .default, reuseIdentifier: nil)
	// ios 10加上
	cell.isUserInteractionEnabled = false
	return cell
}
5.ASEditableTextNode显示中文问题
ASEditableTextNode 默认高度只是适应英文字母,如果输入中文会被裁了一截,在初始化时需要指定一下ASEditableTextNode的高度。
1
2
let editableTextNode = ASEditableTextNode()
editableTextNode.style.height = ASDimensionMake(44)