前言
在我们Swift日常开发过程中,经常有用到高阶函数来简化处理一些数组、集合的数据。本篇文章主要分析日常用到的高阶函数的特点和用法。
高阶函数的定义
- 接收一个或多个函数当作参数
- 把一个函数当作返回值
至少满足以上条件中的一个的函数,那么这个函数就被称作高阶函数。
高阶函数的优势
- 简化代码
- 使逻辑更加清晰
- 当数据比较大的时候,高阶函数会比传统实现更快,因为它可以并行执行(如运行在多核上)
高阶函数
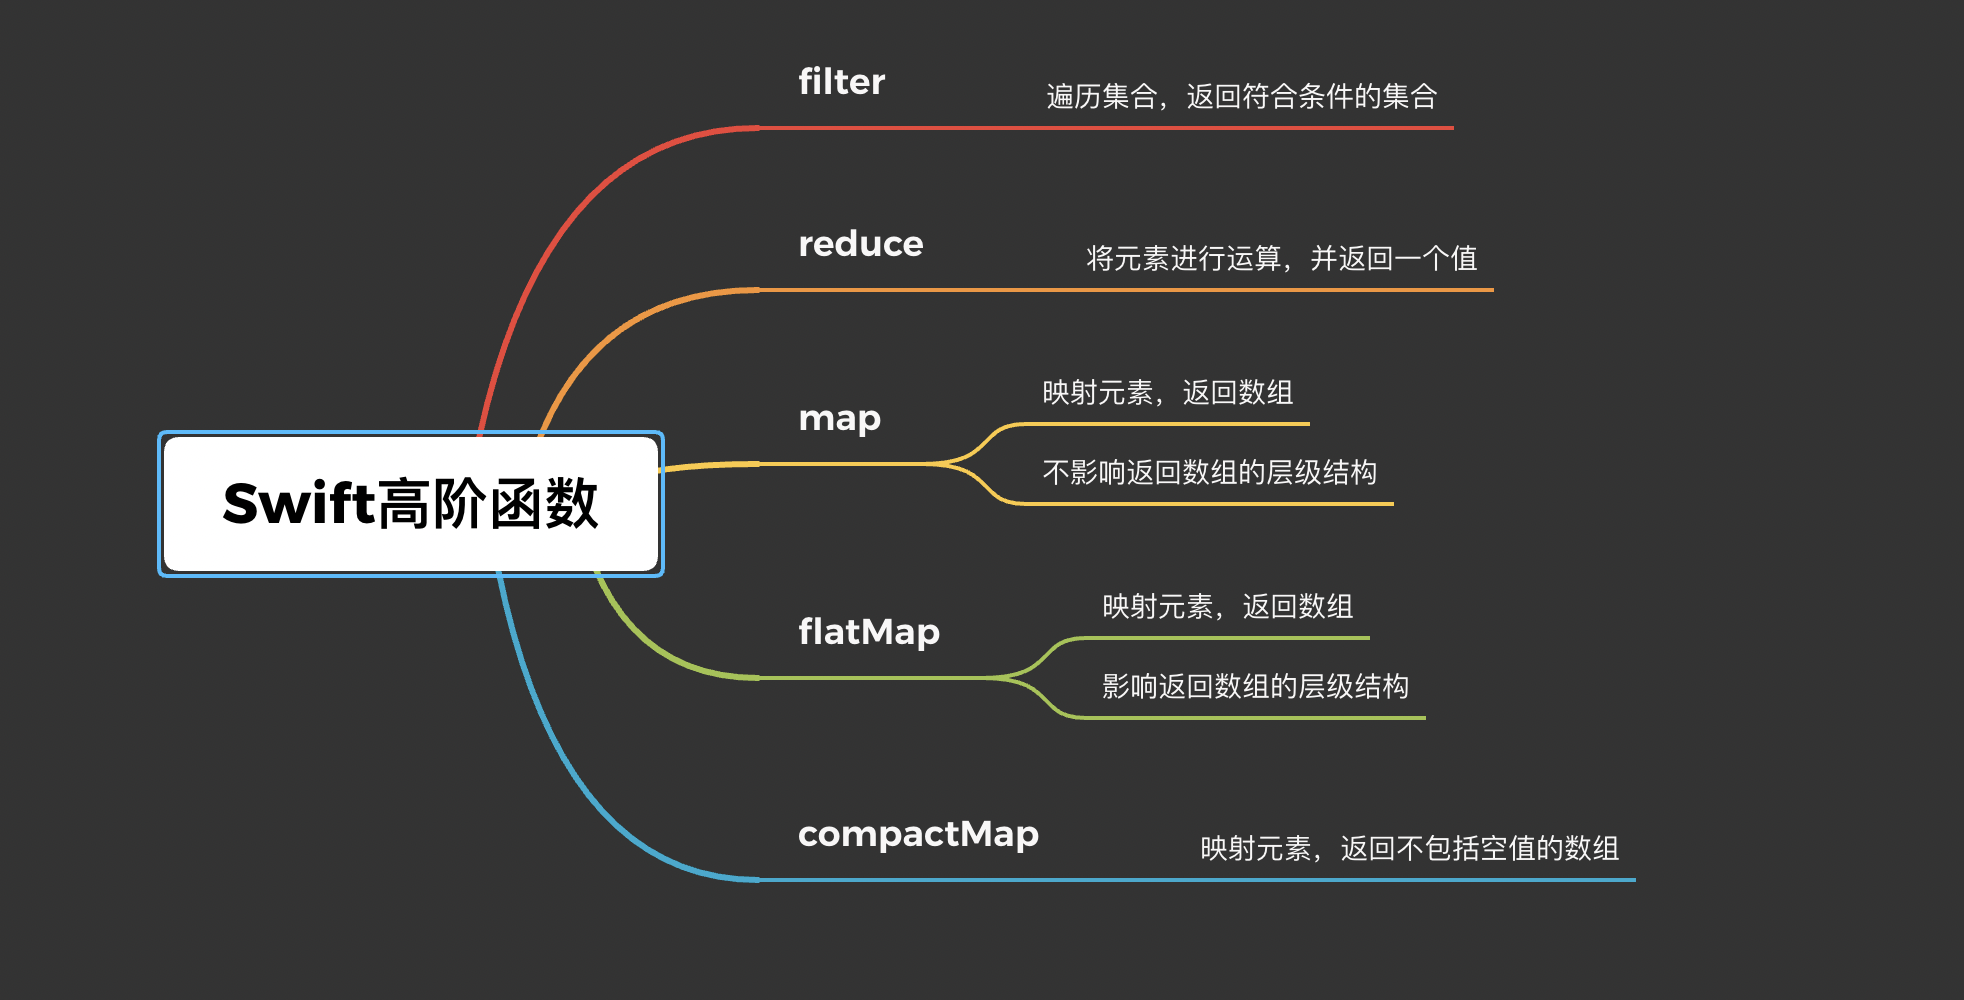
filter
filter用来过滤元素,即筛选出数组元素中满足某种条件(闭包实现)的元素。
1.基本使用
- 筛选出数组中的男生
1
2
3
4
5
6
7
8
9
10
11
12
13
14
struct Person {
    let id: String
    let name: String
    let age: Int
    let gender: Int // 0: 女 1: 男 2: 未知
}

let per1 = Person(id: "1001", name: "stu1", age: 12, gender: 0)
let per2 = Person(id: "1002", name: "stu2", age: 14, gender: 1)
let per3 = Person(id: "1003", name: "stu3", age: 16, gender: 1)
let per4 = Person(id: "1004", name: "stu4", age: 20, gender: 2)
let pers = [per1, per2, per3, per4]
let result = pers.filter { $0.gender == 1 }
print(result) // 输出结果per2、per3
2.源码分析
1
2
3
4
5
6
7
8
9
10
11
12
13
14
15
16
17
public __consuming func filter(_ isIncluded: (Element) throws -> Bool) rethrows -> [Element] {

    return try _filter(isIncluded)
  }

@_transparent
public func _filter(_ isIncluded: (Element) throws -> Bool) rethrows -> [Element] {

    var result = ContiguousArray<Element>()
    var iterator = self.makeIterator()
    while let element = iterator.next() {
      if try isIncluded(element) {
        	result.append(element)
      }
    }
    return Array(result)
}
通过代码分析,filter实现的步骤:
- 1.调用
_filter方法传入isIncluded - 2.构造一个名为
result的新数组,用于存放新的结果 - 3.使用迭代器,遍历所有的元素,对于每个元素,调用闭包
isIncluded,判断是否符合条件 - 4.将符合条件的元素使用
append方法放入result中 - 5.遍历完成后,返回
result
reduce
reduce联合集合中所有的值,并返回一个新值.
首先看看reduce有两个函数定义
1
2
3
@inlinable public func reduce<Result>(_ initialResult: Result, _ nextPartialResult: (Result, Element) throws -> Result) rethrows -> Result

@inlinable public func reduce<Result>(into initialResult: __owned Result, _ updateAccumulatingResult: (inout Result, Element) throws -> ()) rethrows -> Result
reduce两个函数都是把数组元素组合计算为另一个值,并且会接受一个初始值,这个初始值的类型可以和数组元素类型不同,这样子就有很大的可操作空间。reduce两个函数效果是一样的,但差别就在于闭包的定义:
第一个函数闭包,接收
Result和Element,返回闭包执行后的Result,后续的操作是将每次闭包执行后的Result当做下一个元素执行闭包的入参,直到遍历完所有元素。第二个函数闭包,接收的依然是
Result和Element,不过没有返回值,并且Result是用inout修饰的,所以传入闭包的是Result的地址,所以闭包的执行都是基于Result进行操作。
1.基本使用
求分数总和
1
2
3
4
5
6
7
8
9
10
11
12
13
14
15
16
17
struct Person {
	 let id: String
	 let name: String
	 let age: Int
	 let gender: Int // 0: 女 1: 男 2: 未知
	 let score: Int
}

let per1 = Person(id: "1001", name: "stu1", age: 12, gender: 0, score: 88)
let per2 = Person(id: "1002", name: "stu2", age: 14, gender: 1, score: 60)
let per3 = Person(id: "1003", name: "stu3", age: 15, gender: 1, score: 100)
let per4 = Person(id: "1004", name: "stu4", age: 13, gender: 2, score: 99)
let pers = [per1, per2, per3, per4]
let res = pers.reduce(0) { (res, ele) in
    return res + ele.score
}
print("res = \(res)")
求出数组中奇数的和、以及偶数乘积
1
2
3
4
5
6
7
8
9
10
11
12
let nums = [1, 3, 2, 4, 7, 9, 11, 15, 13]
typealias ResTuple = (Int, Int)
let res = nums.reduce((0, 1)) { (r, i) -> ResTuple in
    var temp = r
    if i % 2 == 0 {
        temp.1 *= i
    } else {
        temp.0 += i
    }
    return temp
}
print("奇数和为: \(res.0),偶数乘积为: \(res.1)")
2.源码分析
1
2
3
4
5
6
7
8
9
10
11
12
13
14
/// reduce第一个函数源码
@inlinable
public func reduce<Result>(
_ initialResult: Result,
_ nextPartialResult:
  (_ partialResult: Result, Element) throws -> Result
) rethrows -> Result {
    var accumulator = initialResult
    for element in self {

      accumulator = try nextPartialResult(accumulator, element)
    }
    return accumulator
}
第一个reduce函数实现步骤
- 1.定义 accumulator 临时变量,并赋值 initialResult
- 2.遍历所有的元素,对于每个元素,调用闭包 nextPartialResult
- 3.将闭包执行的结果赋值给临时变量 accumulator
- 4.遍历完成后,返回 accumulator
1
2
3
4
5
6
7
8
9
10
11
12
13
14
15
/// reduce第二个函数
@inlinable
public func reduce<Result>(
into initialResult: __owned Result,
_ updateAccumulatingResult:
    (_ partialResult: inout Result, Element) throws -> ()
  ) rethrows -> Result {

    var accumulator = initialResult
    for element in self {

      try updateAccumulatingResult(&accumulator, element)
    }
    return accumulator
}
第二个reduce函数实现步骤
- 1.定义 accumulator 临时变量,并赋值 initialResult
- 2.遍历所有的元素,对于每个元素,调用闭包 updateAccumulatingResult,参数是临时变量 accumulator 的地址,闭包执行其实就是更新 accumulator 的值
- 3.遍历完成后,返回 accumulator
区别
- 第一个函数是将闭包执行的结果赋值给临时变量
accumulator,然后遍历下一个元素,直到遍历结束,返回accumulator。 - 第二个函数是将临时变量
accumulator的地址值当做闭包的第一个参数,闭包的执行就是在操作accumulator的值。
Map
map函数的作用就是对集合进行一个循环,循环内部再对每个元素做同一个操作。它返回一个包含映射后元素的数组。
简单说就是数组中每个元素通过某种规则(闭包实现)进行转换,最后返回一个新的数组。
1.基本使用
1
2
3
4
/// 将Int类型数组中的元素乘以2,然后转换为String类型的数组
let testArr: [Int] = [23, 20, 16, 40, 20]
let strArr: [String] = testArr.map { "\($0 * 2)" }
print("strArr = \(strArr)")
2. 源码分析
1
2
3
4
5
6
7
8
9
10
11
12
13
14
15
16
17
18
public func map<T>(
    _ transform: (Element) throws -> T
  ) rethrows -> [T] {

    let n = self.count
    if n == 0 {
      return []
    }
    var result = ContiguousArray<T>()
    result.reserveCapacity(n)
    var i = self.startIndex
    for _ in 0..<n {
      result.append(try transform(self[i]))
      formIndex(after: &i)
    }
    _expectEnd(of: self, is: i)
    return Array(result)
}
实现步骤
- 1.构造一个名为 result 且与原数组的 capacity 一致的新数组,用于存放新的结果
- 2.遍历自己的元素,对于每个元素,调用闭包的转换函数 transform ,进行转换
- 3.将转换的结果使用 append 方法放入 result 中
- 4.遍历完成后,返回 result 。
tips: ContiguousArray是Swift提供的更高性能的数组,完全可以使用ContiguousArray取代Array来使用,可以有更高的性能。
flatMap
flatMap的实现与map类似,也是数组中每个元素通过某种规则(闭包实现)进行转换,最后返回一个新的数组。flatMap能把数组中存有数组的数组(二维数组、N维数组)一同打开变成一个新的数组,称为降维,通俗一点就是把多维数组都会拍扁为一维数组。
apple解析: Apple docs 解释: 返回一个对序列的每个元素进行形变的串级结果( Returns an array containing the concatenated results of calling the given transformation with each element of this sequence.)
1
2
3
4
5
6
// flatMap 定义
public func flatMap<SegmentOfResult>(_ transform: (Element) throws -> SegmentOfResult) rethrows -> [SegmentOfResult.Element] where SegmentOfResult : Sequence

// Swift 4.1 以前的定义,4.1之后改名为 compactMap
@available(swift, deprecated: 4.1, renamed: "compactMap(_:)", message: "Please use compactMap(_:) for the case where closure returns an optional value")
public func flatMap<ElementOfResult>(_ transform: (Element) throws -> ElementOfResult?) rethrows -> [ElementOfResult]
1.基本使用
1
2
3
4
/// 将Int类型数组中的元素乘以4
let testArr: [Int] = [23, 20, 16, 40, 20]
let strArr: [String] = testArr.flatMap { "\($0 * 4)" }
print("strArr = \(strArr)")
1
2
3
4
5
6
7
/// 生成一个新的Int数组,元素是多少元素就重复多少个
let testArr: [Int] = [3, 5, 7, 8, 9]
/// 返回二位数组
let strArr1 = testArr.map { Array(repeating: $0, count: $0) }
/// 降一维数组
let strArr2 = testArr.flatMap { Array(repeating: $0, count: $0) }
print("strArr1 = \(strArr1) strArr2 = \(strArr2)")
flatMap把数组中的数组都打开了,最终返回的是一个一维数组。而map返回的是一个二维数组,没有降维。
2. 源码分析
1
2
3
4
5
6
7
8
9
10
public func flatMap<SegmentOfResult: Sequence>(
    _ transform: (Element) throws -> SegmentOfResult
  ) rethrows -> [SegmentOfResult.Element] {

    var result: [SegmentOfResult.Element] = []
    for element in self {
      result.append(contentsOf: try transform(element))
    }
    return result
}
实现步骤:
- 构造一个名为 result 的新数组,用于存放新的结果
- 遍历自己的元素,对于每个元素,调用闭包的转换函数 transform ,进行转换
- 将转换的结果使用 append-contentsOf 方法放入 result 中
- 遍历完成后,返回 result
flatMap与map是有一些区别:
1.transform的差别
map的transform接收的参数是数组元素然后输出的是闭包执行后的类型T,最终执行的结果的是[T]- flatMap
的transform接收的参数是数组的元素,但输出的一个Sequence类型,最终执行的结果并不是Sequence的数组,而是Sequence内部元素另外组成的数组,即:[Sequence.Element]
2.第三个步骤的差别
map使用append方法放入result中,所以transform之后的结果是什么类型,就将什么类型放入result中;flatMap使用append-contentsOf方法放入result中,而appendContentsOf方法就是把Sequence中的元素一一取出来,然后再放入result中,这也就是flatMap能降维的原因。
Optional 中的 map 和 flatMap
Optional中也有这两个高阶函数map和flatMap,定义如下:
1
2
3
4
5
6
7
public enum Optional<Wrapped> : ExpressibleByNilLiteral {
    case none
    case some(Wrapped)
    public init(_ some: Wrapped)
    public func map<U>(_ transform: (Wrapped) throws -> U) rethrows -> U?
    public func flatMap<U>(_ transform: (Wrapped) throws -> U?) rethrows -> U?
}
1.基本使用
1
2
3
4
5
6
7
8
/// 修改一个可选Int的值
let a1: Int? = 20
let b1 = a1.map { $0 * 2 }
print(b1) // 打印结果:Optional(20)

let a2: Int? = nil
let b2 = a2.map { $0 * 2 }
print(b2) // 打印结果:nil
可以得出结论,当输入的是一个Optional,同时需要在逻辑中处理这个Optional是否为nil,那么就适合用map来替代原来的写法,使得代码更加简短。
1
2
3
4
5
6
7
8
/// 将一个字符串转换成Int
let s: String? = "abc"
let mapR = s.map { Int($0) }
let flatMapR = s.flatMap { Int($0) }
// Optional(nil) --> map 会多包一层Optional
print(mapR)
// nil
print(flatMapR)
当我们的闭包参数有可能返回nil的时候,使用flatMap会更加合适,map会多包一层Optional,这样就很容易导致多重Optional嵌套的问题。关于嵌套问题可以查看这篇文章
compactMap
compactMap是在4.1之后对flatMap的一个重载方法的重命名,同样是数组中每个元素通过某种规则(闭包实现)进行转换,最后返回一个新的数组,不过compactMap会将nil剔除,并对Optional进行解包。
1.基本使用
1
2
3
4
/// 将String类型的数组转换为Int类型的数组
var arr = ["12", "ad", "33", "cc", "22"]
var compactMapArray = arr.compactMap { Int($0) }
print(compactMapArray) // compactMap打印结果:[12, 33, 22]
最终返回的是[Int],一个Int数组,并将其中转换失败的nil过滤掉了,并对转换成功的Optional值进行了解包。
2. 源码分析
1
2
3
4
5
6
7
8
9
10
11
12
13
14
15
16
17
public func compactMap<ElementOfResult>(
    _ transform: (Element) throws -> ElementOfResult?
  ) rethrows -> [ElementOfResult] {
    return try _compactMap(transform)
}
public func _compactMap<ElementOfResult>(
_ transform: (Element) throws -> ElementOfResult?
) rethrows -> [ElementOfResult] {

    var result: [ElementOfResult] = []
    for element in self {
      if let newElement = try transform(element) {
        result.append(newElement)
      }
    }
    return result
}
实现步骤:
- 调用 _compactMap 方法 传入 transform
- 构造一个名为 result 的新数组,用于存放新的结果
- 遍历自己的元素,对于每个元素,调用闭包的转换函数 transform ,进行转换
- 将转换的结果 使用 if - let 后,再使用 append 方法放入 result 中
- 遍历完成后,返回 result
compactMap与map的区别就在于,map将transform后的结果直接放入result中,而compactMap使用if-let后再放入result中,而if-let的作用就是解包和过滤nil。
reduce 有趣的拓展
1.使用reduce实现map的功能
1
2
3
4
5
6
7
8
9
10
11
12
13
let arr = [1, 3, 2]
let r1 = arr.reduce([]) { $0 + [$1 * 2] }
print(r1) // 打印结果:[2, 6, 4]

let r2 = arr.reduce([]) {
    var temp = $0
    temp.append($1 * 2)
    return temp
}
print(r2) // 打印结果:[2, 6, 4]

let r3 = arr.reduce(into: []) { $0 += [$1 * 2] }
print(r3) // reduce-into打印结果:[2, 6, 4]
2.使用reduce实现filter的功能
1
2
3
4
5
6
let nums = [1, 2, 3, 4]
let result = nums.reduce([]) { $1 % 2 == 0 ? $0 + [$1] : $0 }
print(result) // 打印结果:[2, 4]

let r2 = nums.reduce(into: []) { $0 += $1 % 2 == 0 ? [$1] : [] }
print(r2) // reduce-into打印结果:[2, 4]
3.使用reduce实现flatMap的功能
1
2
3
4
5
6
let nums = [1, 2, 3, 4]
let reduceNums = nums.reduce([]) { $0 + Array(repeating: $1, count: $1) }
print(reduceNums) // reduce打印结果:[1, 2, 2, 3, 3, 3, 4, 4, 4, 4]

let r2 = nums.reduce(into: []) { $0 += Array(repeating: $1, count: $1) }
print(r2) // reduce-into打印结果:[1, 2, 2, 3, 3, 3, 4, 4, 4, 4]
4.使用reduce实现compactMap的功能
1
2
3
4
5
6
7
8
9
var someAry = ["12", "ad", "33", "cc", "22"]
// var reduceAry: [Int]
var reduceAry = someAry.reduce([Int]()) {
    if let i = Int($1) {
        return $0 + [i]
    }
    return $0
}
print(reduceAry) // reduce打印结果:[12, 33, 22]
拓展
Sequence 协议
在上面高阶函数解析,有多处提到Sequence协议,内容如下:
1
2
3
4
5
6
7
8
9
10
11
12
13
14
15
16
17
18
19
20
21
22
23
public protocol Sequence {
  /// 元素
  associatedtype Element
  /// 迭代器
  associatedtype Iterator : IteratorProtocol where Iterator.Element == Element
  /// 子序列
  associatedtype SubSequence : Sequence = AnySequence<Element>
    where Element == SubSequence.Element,
          SubSequence.SubSequence == SubSequence

  /// 返回当前迭代器
  func makeIterator() -> Iterator
  var underestimatedCount: Int { get }
  // 下面是 Sequence extension方法
  func map<T>(
    _ transform: (Element) throws -> T
  ) rethrows -> [T]
  func filter(
    _ isIncluded: (Element) throws -> Bool
  ) rethrows -> [Element]
  func forEach(_ body: (Element) throws -> Void) rethrows
  // 下面还有一大串的方法,但都是扩展方法,这里不一一列举了
}
Sequence 协议中,主要有两个参数, 一个是 Element,也即是 sequence 里的元素,别一个则是 Iterator(迭代器),Iterator 是实现 IteratorProtocol 协议并且迭代器的元素和 sequence 的元素是相同类型(Iterator.Element == Element)。
IteratorProtocol 源码
1
2
3
4
public protocol IteratorProtocol {
  associatedtype Element
  mutating func next() -> Element?
}
IteratorProtocol 的核心是 next() 方法,这个方法在每次被调用时返回序列中的下一个值。当序列下一个值为空时,next() 应该返回 nil。
自定义一个 iterator
1
2
3
4
5
6
7
8
9
10
11
12
13
14
struct CustomIterator: IteratorProtocol {
    var num = 0
    mutating func next() -> Int? {
        num += 1
        if num == 10 {
            return nil
        }
        return num
    }
}
var iter = CustomIterator()
while let num = iter.next() {
    print(num)  // 1,2,3,4,5,6,7,8,9
}
如果需要自定义一个 sequence 时,其实只需要实现 makeIterator 方法就可以了
1
2
3
4
5
6
7
8
9
struct CustomSequence: Sequence {
    func makeIterator() -> CustomIterator {
        return CustomIterator()
    }
}
let sequence = CustomSequence()
for item in sequence {
    print(item)   // 1,2,3,4,5,6,7,8,9
}